Wednesday, February 24, 2016

3D Japanese Koi Watercolor Art Project


I love doing Koi Watercolor paintings!  The blue and orange look so great together and there is no way for the student to feel unsuccessful - there is no right or wrong way to paint the fish!
I had seen several versions of this project on Pinterest but couldn't find the pattern for the fish so I made my own.  Here is a Jpeg version and the instructions to make them.  
Mine are printed on 8.5 X 11" paper.
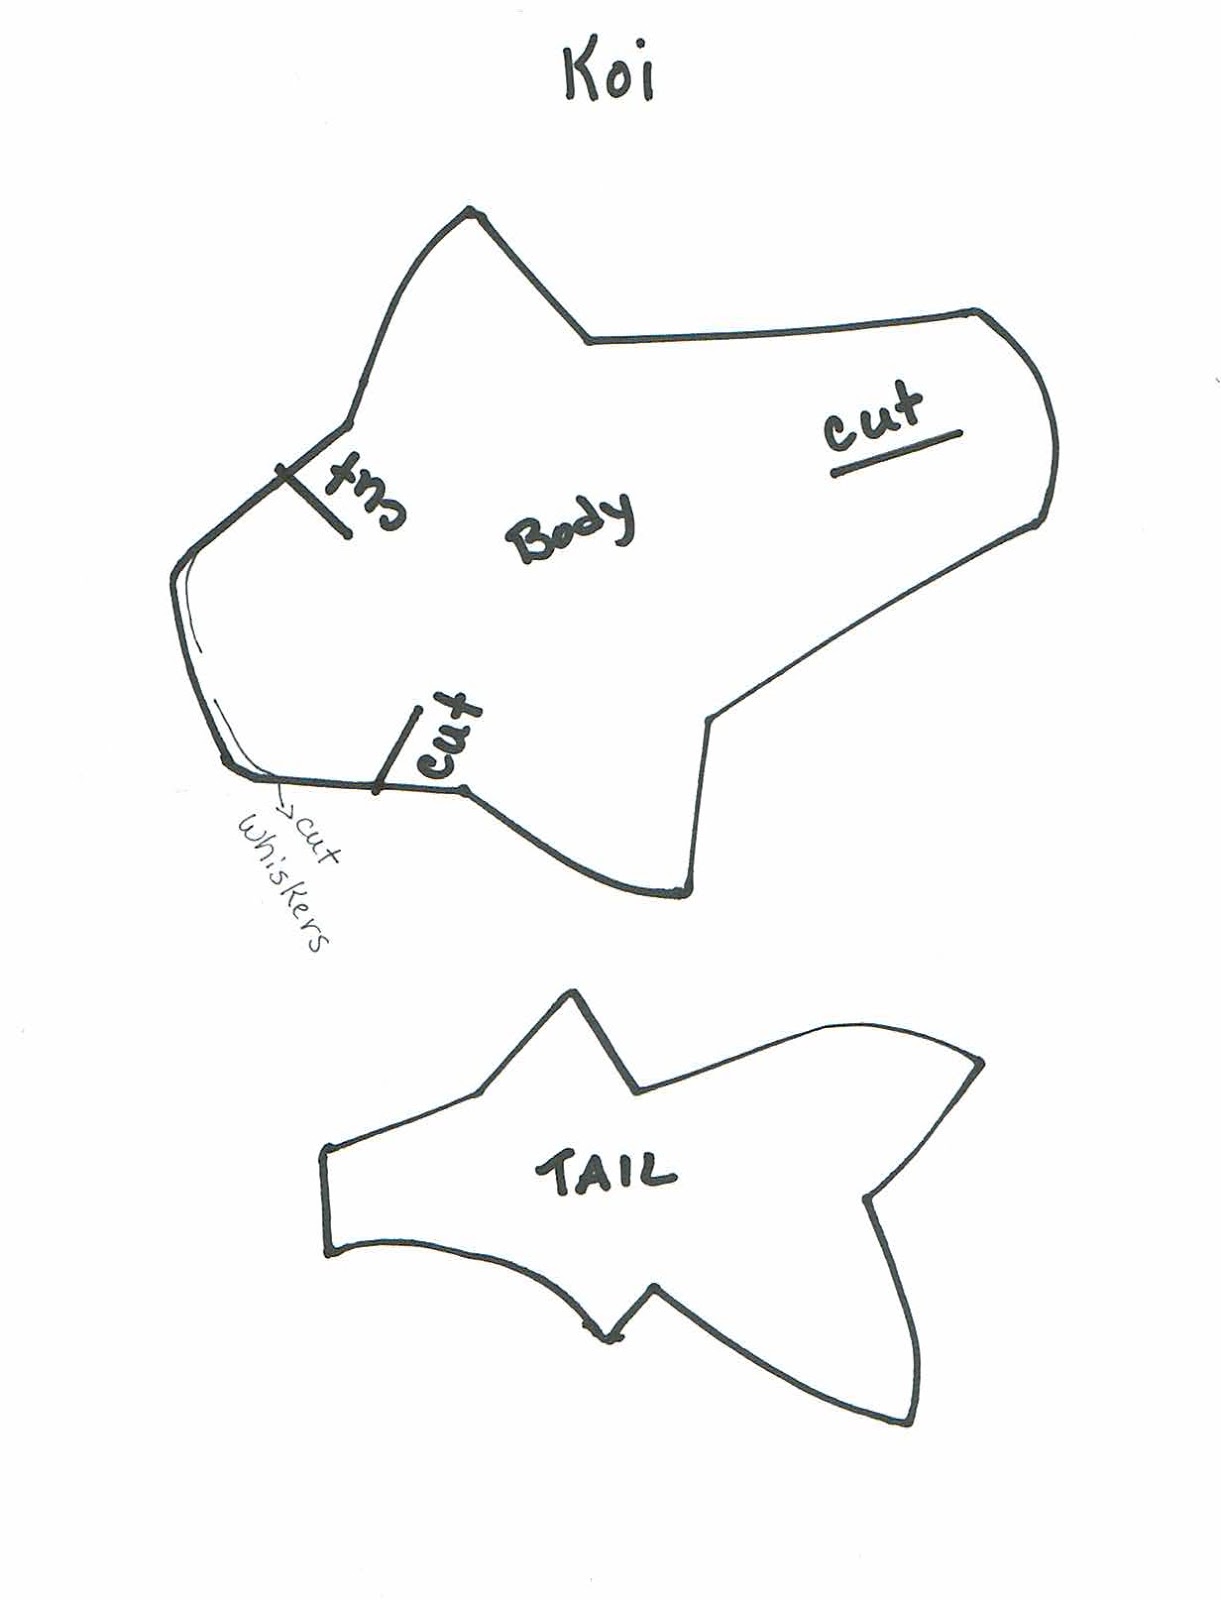
I traced and cut out the shapes using watercolor paper.
I folded the front of the fish in half to make it easier to cut the slits for the face and the whiskers.
You will need to cut a slit in the top back of the fish for the fin to poke through.  You can just carefully cut a thin slice along the fold or use an X Acto knife.

The back fin is put in the cut along the back.

Now staple the two pieces together as shown.

Bend the front of the fish where the slits in the side are and then glue in place - I used a tiny dab of hot glue.


Fold the front fins so the fish can lay flat.

Fold the tail in the back so that it almost lays flat and put a curve in the tail before the staple.  
These look so much like they're swimming off the paper.


There are several varieties of Koi, but most have orange, yellow, red, blue and black.  I just added splotches of color and did wet into wet with those colors.
I'm going to show my students this chart for ideas:

You can play around with the eyes to give them a little more personality.

The water is simply two shades of blue done Wet into Wet and then sprinkled with salt. 
 I thought it would be fun to do a rectangle instead of a square for this version.

These can be made out of any kind of paper or even felt.  Patterned paper could be a fun option too!
The students will enjoy these beautiful maintenance free new pets!
Student Work:


Friday, February 12, 2016

Chinese New Year Brush Painting Banner


I love doing an annual Chinese New Year art lesson.

2016 is the Year of the Monkey - a fun subject to paint!  
I tried to simplify the monkey so that it would be easier for Elementary students to paint.  
It is really just the suggestion of a monkey done in simple continuous line.

According to Chinese Astrology:
The Chinese New Year of the Fire Monkey will start on February 8, 2016 – the second New Moon after the Solstice. Following 12 months of the dignified and surefooted Goat, the New Year of the Red Monkey is going shake, rattle and roll!


You will need:
White paper
red paper
black ink or paint
optional gold paint
brushes
pencils
glue
chopsticks
hole punch
string
I use this calligraphy paper that I found at our Daiso store - 

I'm going to have the students do some sketching of the Monkey and the Chinese symbol for Monkey on scrap paper.  

Here are step by step photos if you need them:
 Start with the forehead and nose...
 Add the eyebrow and eye using one continuous line
 Add the top of the head and the ear also as a continuous line, then continue the line down for the back of the monkey
 Add the mouth, nose and eye
Continue the line from the back into a tail that curls on the end.
After pencil sketching they can go over the lines with a sharpie.  This should make their sketch dark enough to trace onto their banner paper.

Then they will lightly sketch their monkey and Chinese symbol on the banner paper.

We'll discuss how different it is to work with a brush instead of a pencil.  How it is desirable to have thick and thin areas in the drawing because of the brush so they should embrace it.  Have them experiment with using the tip of the brush and also dragging the brush along the paper sideways on scrap paper.

I'll demonstrate painting the monkey for the students and then they can do their own.

I added the 2016 at the bottom freehand - they can decide if they want to add it or not.  Give the ink a few minutes to dry.

You can add a red border to the top and bottom of the banner if you want.

For the final touch punch two holes in the top of the banner with a hole punch.  Thread a chopstick through the holes and add a loop of string for hanging.
  
This might be a good time to talk about the color red and how Red is the Chinese national color and represents happiness, beauty, success and good fortune.
Red is used extensively in everyday life. Red lanterns adorn businesses and residences. Double rows of red "Xi" (happiness) letters are pasted on gates and doors. People wear red during weddings, festivals and other celebratory events. Red envelopes stuffed with money are given as gifts during Chinese New Year.


Romero Britto Pond Life or Frog Watercolor Art Project

  My 2nd grade students are studying Pond Life and Romero Britto is so much fun I thought they would enjoy making a bright and colorful frog...