Sunday, November 27, 2016

Woven Christmas Tree Art Lesson Tutorial

Using a simple paper plate loom students can create their own woven tree.

I was inspired by this pin on pinterest:

I changed it a bit and came up with this.

You'll need:
Yarn
Scissors
7" paper plates
Beads and bells if wanted

Using this template I cut notches in the sides of the plates.
Then I used approximately 3 yards of yarn and folded it in half.
I put the folded end under the 2 notches on one side of the plate.

Next I put one side of the yarn through a notch on the right top and another side of the yarn through the notch on the left top.
I kept the yarn separate and kept on looping it into the notches on each side.  The yarn goes underneath the plate through the bottom notch again and back up to the top notch over and over.
The back of the plate.
Bring the two strings up to the 2 notches and cross them over each other.
Criss cross the yarn over the top and under the yarn two times and then pull the strings tight.
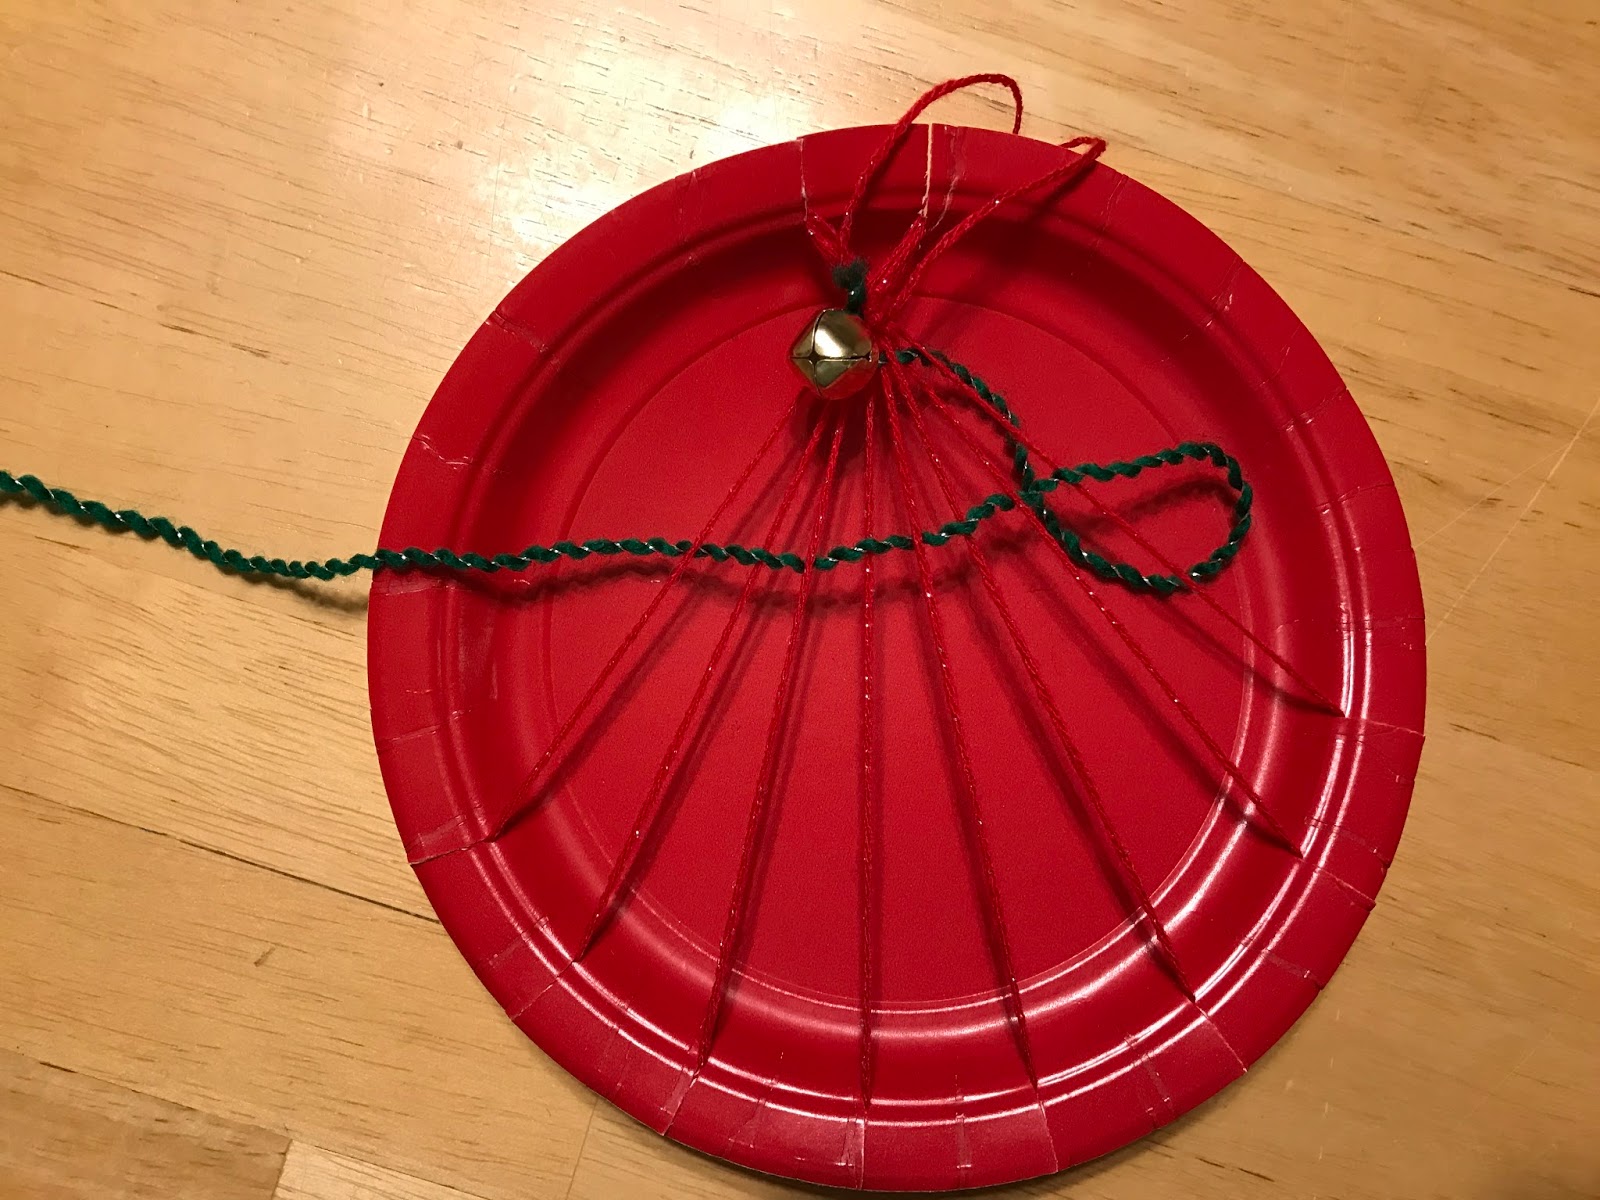
Now tie a knot with the strings to keep the top of the tree tight.
Tie another knot in the two strings up higher to create a hanger.
Now you're ready to begin weaving.
This is called the warp on the loom.  The yarn we weave with is called the weft.
I pre made my looms since I am doing this with 1st grade students.
Tie a piece of yarn to the outside string of yarn and weave it over and under each strand of yarn.
I start over the first strand and then alternate.  You always have to do the opposite of what you just did - over and then under - over then under.
You can weave it into the wider strings toward the bottom, which is easier, and then pull it to the top and snug it up.
I am using shorter lengths of yarn, maybe a yard at a time to make it easier.  When I get to the end I tie another strand on with a knot and keep going.  If you want to put beads on just thread them onto the yarn.

When you get to the end simply tie the yarn onto the outside string.

This is a simple weaving activity where students will see the results of their effort quickly.  It will be confusing for some at first, but when they stick with it and master it they will be so proud of themselves!
My 1st Grade student's work:


Monday, November 21, 2016

Santa Gnome Ornament DIY

Easy to make Gnomes using a cork as a base.

A Tomte, Nisse or Tomtenisse (Sweden), Nisse (Norway and Denmark) or Tonttu (Finland) is a mythological creature from Scandinavian folklore which is typically associated with the winter solstice and the Christmas season. It is generally described as being no taller than three feet, having a long white beard, and wearing a conical or knit cap in red or some other bright color.  The tomte / nisse will deliver gifts at the door, in accordance with the modern-day tradition of Santa Claus.  He usually lives in the forest and travels to homes on a sled with reindeer, but they don't fly.  It's tradition to leave him some porridge with butter as a thanks for his visit.

They often have an appearance similar to a garden gnome and are believed to guard your home and family, protecting them from misfortune, particularly at night, when everyone is asleep. If you take good care of a Tomte, he will protect you and watch over your family!

You'll need:
Wine Corks
Red Felt
White Yarn
Pompoms
Wooden Ball - 3/8"
Decorative Accents

5 yards of yarn folded over until it is about 6" long
I used Yarn Bee Fleece Lite yarn from Hobby Lobby
Tie a piece of yarn around the center of the yarn and make a knot.
Glue the middle of the yarn onto the top of the cork with hot glue.
This is a pdf pattern for the hat - 2 hats fit on half of a 8 1/2 X 11" sheet of paper
Cut the hat out of felt and glue the hanger to the inside of the hat.  Glue the edges together to fit over the yarn and the cork.
Let the yarn hang down over the cork, put hot glue on the bottom edge of the hat and place the hat over the yarn.
You'll need to trim the beard - you can leave it long all around or cut the back a little shorter so it's not quite so shaggy.
Glue the nose and decorations with hot glue.


Wednesday, November 9, 2016

Fall Trees Reflected In A Pond Step by Step Art Lesson

This is a lovely Fall Painting where students can feel successful no matter their age or ability.

Supplies Needed:
Watercolor Paper
Blue Watercolor Paint
Acrylic or Tempra Paint - yellow, red, orange, green and brown
Brushes

Have the students fold their paper in half.
Students will create a light blue background and add some wavy lines in the bottom half for the water.
Let this dry.

Add the land just above the fold line.  Make sure it is still wet and fold it over applying pressure to the green area so it prints onto the bottom half.

 Next add each tree, printing each tree after it is painted and still wet.
I used two colors for each tree, a background color and another accent color.
Don't worry about the bottom half not printing as a solid area of color, that's what makes it look like a reflection in the water.
Add spots of color in a variety of colors and sizes to make it look like leaves on the ground.
Next add the trunks of the trees, I painted a y shape and made the trunks a little bit wobbly so they look more natural.
 The students will have fun printing the reflections and be thrilled with their finished work.

Romero Britto Pond Life or Frog Watercolor Art Project

  My 2nd grade students are studying Pond Life and Romero Britto is so much fun I thought they would enjoy making a bright and colorful frog...